Friday, September 24, 2010

Long Dry Spell

This is my first post for the month of September.  I took some time off to attend the 30th National Narrow Gauge Convention in St. Charles, Missouri.  We did a few days sightseeing in the St. Louis area and among other things we took a tour of the Anheuser-Busch Brewery and explored Union Station.  Union Station is a truly beautiful structure that covers 42 acres and should not be missed if you are in the area.

After attending the narrow gauge convention which was a real treat as it always is, we were driven by Bill and Donna Weltyk to there home in Downers Grove outside of Chicago.  We spent the next 3 days being shown the sights in and around Chicago.  One of the places we visited was the Illinois Railway Museum which is the largest railway museum in the country.


One of the many engines they had on display was a Union Pacific gas turbine.  I had never seen one of these engines before and I was impressed with how large it is.  The museum has hundreds of engines, freight cars, passenger cars, interurban and street cars, many of which have been restored and can be ridden.


During our tour of Chicago, we visited the Illinois Museum of Science and Industry.  They have a fully restored Zephyr that we were able to tour. Quite a treat for a West Coast guy.  That is my friend Bill on the left standing next to me.  Chicago is a beautiful city and Laurie and I cannot thank Bill and Donna enough for showing us the sites. 
                                                                                                                                          
I have finally gotten back to working on the railroad but do not have a lot of progress to report.  I removed the entire railroad from the garage so my son could spray paint some haze onto the blue sky.
It is very subtle and I'm not even sure that it will be noticeable in a photo but it looks better to me.  I have returned all of the bench work to the garage and this time it is bolted together and attached to the wall.  This makes it very stable and it does not shift around when I am working on it.                              


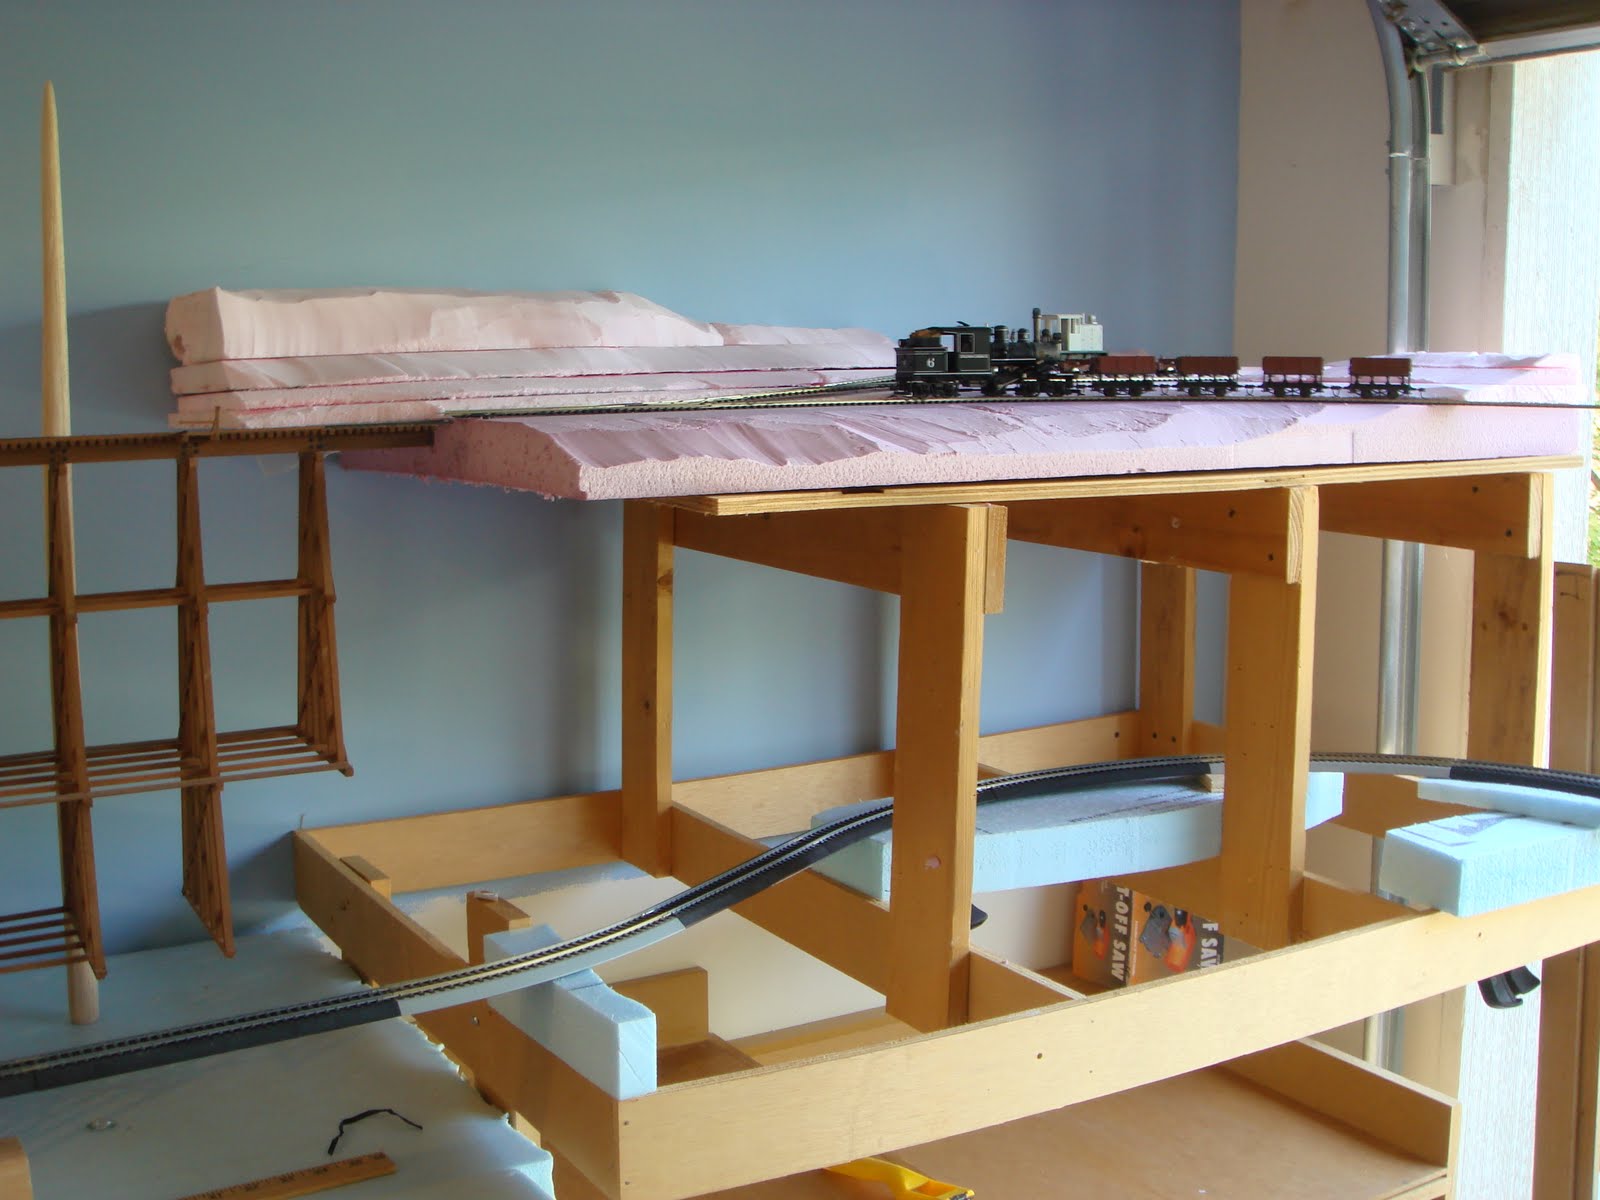
As you can see in the photo I have hot wired a little more of the scenery behind the upper track and have fastened the pieces of foam together using Liquid Nail for Projects as recommended by Dave Frary in his 
excellent books and DVD's on how to create model railroad scenery.  A must have if you are building a model railroad.  In the bottom of the photo you can see that I have started fastening down track and soldering the feeder wires.  The lower track on the right is part of the lower loop that will be in a tunnel and the track on the left is hidden track to store a train that I may want to run around the loop at times.  Sort of a staging track.  The upper track is the tail end of the upper switchback and has a runaround track so that I can move the engine to the other end of the train.  This is because it is a 5% grade and I always want the engine on the down-hill end of the train.  

Since this railroad represents a backwoods logging and mining operation, I do not want any kind of a formal built up grade or any ballast.  I do, however, need something between the track and the plywood to deaden the sound so I have glued some 1/8" cork down before attaching the track. This should maintain a low profile and allow me to cover most of the ties with dirt to get the look I want.  Next up I plan to weather the rails, put Sculpt-mold over the foam, and paint it.  That should keep me busy for the next week.


Saturday, August 28, 2010

Heat Wave

We have been having a heat wave here in the San Joaquin Valley this past week with temperatures of up to 110 for several days.  Needless to say, it has been pretty hot in the garage so I did not get much done out there. Not living in the land of basements puts a real cramp on model railroading in California.  I have a room upstairs that is about the same size as the garage space I am using but when we moved in about 6 years ago I was and still am interested in building and displaying HO dioramas so the room is dedicated to that pasttime.  Someday I will post some photos of what's going on in that room.


I put in some retaining walls on the trestle and started to rough in some scenery.  The emphasis is on rough.  I will be refining it in the future.  Right now I am just searching for what looks right and so far this isn't it.


The only other thing I managed to get done this week is a little more hot wire work on the land forms.  I am just working out some general land forms and hope to pull it all together with some plaster and some rock work.  That and a lot of trees and undergrowth should give the effect I am looking for.

I hope to have more progress to report in the future.

Friday, August 20, 2010

Log Loading Area

I spent some time this week figuring out just where the track was going using flex track instead of ready track.  Not much new to see so I won't post any photos of that end of the railroad.  I did, however, do some work on the log-loading area in the corner next to the garage door.  This area is just beyond the high trestle.


The above photo shows the area I have been working in.  The track that comes in from the left and continues off to the right is the main high line.  The train in the foreground has just crossed the trestle and is headed towards the mine.  At that point the railroad becomes a twin-level railroad and the track on the upper level crosses over the yard area that is on the lower level and proceeds to the mine which is also on an upper level.  The track behind the main holds some skeleton log cars and that is to be the log loading area.  The rear track with the gas mechanical engine is the track that will hold the log loader.  More about that below.  The area directly behind the third track is where the steam powered yarder will sit and will be dragging logs into the site.  There will be trees along the back so you cannot see exactly where the logs are coming from but hopefully will give the illusion that they are being dragged from a point where they well felled, deeper in the forest.


This is a photo of Backwoods Miniatures self-propelled log loader kit.  It uses a Bachmann gas mechanical engine as the donor for the drive mechanism.  That explains the gas mechanical in the first photo.  Hopefully when I build mine it will look like the one in the photo.  Well, close anyway.  The space that I have available in the loading area is not large enough to support a haystack loader or any kind of high line rigging so this is my compromise.  The idea is for the loader to pick up a log, rotate 180 degrees and then run along its track to load the log on an empty car.  This way the log cars do not have to be moved once they are spotted until it is time to head for the log dump at the dock.


Here is an overall shot of the area showing the main line below the log-loading area. This line will pass through a tunnel and exit behind the yard on a little higher level and be traveling through a wooded area.

That's it for this week. Hope to do a little land forming in the area of the high trestle in the coming week.

Saturday, August 14, 2010

Travel Time

I have not posted for the last two Fridays because Laurie and I decided to attend the National Garden Railroad Convention that was held in Tacoma, Washington, this year.  We visited garden railroads in the greater Seattle/Tacoma area for 5 days and saw some very nice garden railroads.  Although I have no real interest in building a garden railroad I enjoy seeing good modeling in any scale.  A chance to get out of the heat of Central California and visit the Northwest is always a good thing.  It is also nice because Laurie gets to enjoy the gardening aspect of the hobby as many of the railroads have very nice landscaping.

After the convention we decided to drive up to British Columbia and visit some friends.  We stopped to visit with our good friend Dario Le Donne who is the creator of Rail Scale Miniatures.  We had a great visit and while we were there I picked up his latest kit, which is a real beauty.


This is Horwood Bros. and is an incredibly outstanding kit.  You can also order a lighting kit which must be seen to be believed.  Dario has only been in business for a few years but has turned out a line of fine craftsman kits.  Click on Rail Scale Miniatures in the side bar of this blog to visit his website and check out his line of kits.

We also visited Steve and Cecile Tate, two of our favorite people in the hobby.  Steve has an online business called Kettle Valley Trains and has started manufacturing an upscale precision cutter that cuts wood at any angle.


Here is a close up of the cutting blade.  Instead of coming straight down like a chopper, the blade cuts across the wood, slicing it in two which makes for a clean cut.  You can check out Steve's website by clicking on Kettle Valley Trains in the sidebar under favorite sites.


Steve also sold me the Tractor and Logging Repair Shed from SierraWest Scale Models.  This is an O-Scale kit that I will find a place for on my railroad.  I did not plan to have a model of this type but after one look into the box I knew I had to have it.  I have been buying HO kits from SierraWest since the mid-90's when he started his business and have a standing order to buy whatever he makes.  My hobby room has several of his fine kits built into dioramas and they are pure enjoyment to build. This kit is loaded with detail and the crawler tractor in the foreground of this photo is super detailed as is the whole kit.  Once again, you can find his site listed in the sidebar to the right.  One click and you will see some of the nicest kits you have ever seen.

I am back from my trip and anxious to get started working on the railroad again so check in next Friday as I hope to have some new progress to report.

Friday, July 30, 2010

More About Grades and Track Placement

Since I'm  not making any headway on the backdrop, I decided to spend some time working on grades and the placement of my track work.  As I suspected, the track plan that I posted last week is now obsolete.  The overall plan is still generally correct but I had to move some track around and play a little more with the grades. I also moved a track into a tunnel to ease the clutter.  I will draw my next track plan when all of the track is fastened down.  Until then, nothing is set in stone. Nor will it ever be.


I cut some plywood to cover the part above the bench work. It is being cut to reflect the different elevation of the land but most of it will be covered with scenery and should not be considered ground level.  I have also added a filler piece to the corner which I will shape later.  I wanted a little more separation between the tracks.  Also the scenery will look better without the square corner.

Once again, I will be using flex track and the Bachmann Ready Track is just something I am using for layout.  Nothing is fastened down securely as it all has to come out to paint the backdrop.


One of the changes I made was to move a second track to the tunnel area as the area to the left in this photo was just too busy.  The lower area with the large piece of blue foam is going to be the dock area.  The curved piece of track that ends up in the air is going to the ore tipple that sits out over the water and dumps into an ore barge.  This is part of the Dolly Varden Railroad infuence. The straight piece of track passing under it will lead to the log dump area on the dock.

The brown paper that is taped to the bench work is just to help me visualize what the area will look like with the two hidden tracks showing.


I had a couple of questions about the trestle so I am including another view.  This trestle is based on a plan I found in the Narrow Gauge Gazette.  It is similar to the trestles used by the Rio Grand Southern.  It was a lot of fun to build and I spiked down the rails and guard rails to each tie, making it four spikes per tie.  It was a lot of work but makes for a nice effect.

That's it for this week.

Friday, July 23, 2010

Odds and Ends Part I

I am still waiting for some help painting my back drop so I do not have any big changes to report.  There are a few small things going on, so I haven't been completely idle.


I have had a request for a track plan so I will give it a try.  I have not posted a plan before because it kept changing as I tried to work in the features that I want on the railroad.  Like most of us I want many more things than what will actually fit the space.  I still have not worked out the rat's nest of track that is in the lower left-hand corner.  It includes an upper track, a lower track, a track onto the dock, a track to the elevated tipple and a track leading down from the switch back.  Way to much going on but I really need it all.  It will be interesting (at least to me) to see how this all comes about. 

I have not even thought about the design of the yard, but I know that it must include an engine house with machine shop, a small station of some sort, and storage for a few cars and engines.  I would also like to have a run-around track if possible to help make up trains.

This is the track plan as of July 23rd at 9:40 AM PDT.  Nuff said.


I have been carving 2" extruded foam into some rough shapes that will be the basis of the background scenery.  It is still pretty crude at this point but I will do some final shaping and then add some Sculpamold (which I have never used) to add the final shape and smooth out the transition between pieces of foam. 

I have also been experimenting with making trunks for my twisty wire evergreen trees.  This one may be a little too large diameter wise.  Any thoughts?  My plan is to use this type of tree behind the upper track all the way around the layout.  The foreground trees will be made using Caspia branches.  I may throw in a few furnace filter trees also to add a little variety.  Other trees to be included are yet to be decided.

A friend and fellow modeler by the name of Brain Smith has a rather elaborate machine for making trees of twisted wire and sisal rope and I hope to make good use of it and his skills as I will be needing several dozen tree to get the look I want.


About five years ago I bought a small table saw from Micro Mark and to try it out I took a 1" by 10" by 5' picket from an old redwood fence and ripped it into 3/4" strips on a full-size table saw and then used the new saw to create O-scale lumber.  This trestle is the result of that experiment.  It was a fun project but since I had no plans at that time to build a railroad it just sat around taking up space.  When I decided to try building an On30 layout I decided I would have to work it in some place.  This may be the place.  At some point in the construction I will be showing the trestle in greater detail.

I like to place railroad equipment into the area I am working on to get the feel of what a scene may look like.  This represents a pair of Shays that have just pushed some log cars up the switchback and are now crossing the high trestle to enter the log-loading area.  Yes, I know the log cars should be empty.  As you can see there will be a lower line also crossing the same area on some sort of a low bridge whose design is yet to be determined. 

If anybody is still with me, I hope you find this of interest.  Comments are always welcome.

Friday, July 16, 2010

Planning Backdrops and Grades

This past week I have spent some time trying to figure out what I am going to do about a backdrop.  As I plan to have tall trees along the back of most of the railroad I do not need a lot of scenic details.  With few exceptions I just want to have the area directly behind the trees to be shades of green to give the impression of a dense forest even if I only have a few inches to add model trees in front of it.

Because the back of the railroad will have an elevated railroad line running along it I have to establish the height of the track above the bench work.  This way I will know how high up the wall I need to paint my green background.  In order to do that I have to figure out the where the roadbed will be and in order to do that I have to plan how steep the grades will be on the high line. 

Here is  my progress on that plan.


I have sheet rocked the new wall separating this stall from the rest of the garage.  I only rocked it half way as I want to be able to open the garage doors at each end of the garage to take advantage of any breeze that comes through.  When the basic scenery is done I will sheet rock the other side of the wall and seal off the room.  I will be installing a room air conditioner in the hole at the upper left of the wall.  As you can see I have painted the walls the basic sky blue.  I will try to get some haze airbrushed in along the horizon when I figure out where the horizon is.
At this point I have installed some risers and cut some roadbed which for now is just laid in place.  The roadbed along the left wall is level but climbs along the back wall and the right wall at a grade that is about 4- 3/4% at the steepest.  I did some grade test on my engines under load and quit when I got to 7-1/2% and they were still pulling well so I am happy with grade.
I have also been cutting and placing 2" blue foam along the back of the roadbed.  At this point I am just roughing in the scenery so that I can draw a line on the wall that represents the horizon.  Since I chose not to round the corner of the room I will build up the terrain in the corners and place several tall trees in the corners to hide this fact.  Once I have drawn in the horizon I will pull the foam and roadbed out and work on the backdrop.  As I have no experience at all on painted backdrops I will have to see if I can recruit some help from friends and family.  I may have to reread Tom Sawyer to work that out.

I hope to have more progress next week.  Check back if you are so inclined.

Friday, July 9, 2010

Some Thoughts Regarding Design and Bench Work

This railroad will be based loosely on the Dolly Varden Railroad in upper Canada.  Some of the features it shares are the time period in the early 20th Century, its isolation, its use of narrow gauge equipment and its service of mining and later logging.  It will be very remote with no connection to the rest of the world except by water.  There will be an ore tipple on the wharf and logs will simply be dumped into the bay to be formed into rafts and towed to the sawmill.  There will be no town and very few buildings.  There will be a small yard with an engine house/machine shop and some storage for a few railroad cars.

There will be a loop for continuous running when desired but the railroad will be operated as a point-to-point with a pair of switchbacks on a 5% grade that leads to the mine and the log-loading site. After a lot of indecision, I have decided to use HO flex track as most of it will be out of site or buried in the dirt.  There will be no ballast.  Main line curves will be a 22" minimum radius and the upper line will be 18" minimum radius.  I think this will be fine with the engines I am using.

Motive power will consist of a pair of double headed Shays to climb to the logging site and a Climax to pull a few ore cars to the mine. There will be very little rolling stock and all will be no longer than 30' in length.  There will be a couple of Porters and perhaps a rail truck for maintenance.  I will have a hidden staging track for some other equipment that I may want to bring out and run around the loop when the mood strikes.

The railroad will be power by DCC and I will have sound in as many engines as I can manage.  This is not a large railroad so I plan on it only being operated by two people.  If a third person shows up they could switch the wharf  and/or shuttle cars around the small yard.  More about the design in a later post.


The bench work is going to be an around-the-room design.  It will be 30" deep in all but one section. The height of the bench work is 48" but the track will be 50" to 68" above the floor.  The high point will be at about my eye level.  I am trying to create the illusion that this railroad is high in the mountains.


I am making the bench work, including the legs, out of 1/2" plywood.  I have ripped it down to 3" wide strips and then screwed and glued it into sections that are mostly 4' long.  These are connected with bolts and wing nuts and then they are screwed to the wall.  Additionally, some of the legs have braces for more stability and all legs have levelers in the bottom. This makes for a very stable platform but still keeps it light in weight and easier to breakdown and move if necessary.


I have put the bench work in temporarily to make sure that it fits but will have to remove it to sheet rock the new wall and paint a backdrop.  The backdrop will be fairly simple as I expect to have trees along the back.

That's it for this post.  Check in again next week.

Friday, July 2, 2010

Starting From Scratch


I have decided to build an On30 model railroad after a 30 year gap since my last attempt at building a railroad.  I had been happily building HO scale structure dioramas when the lure of Bachmann's On30 engines convinced me that I should try again. I will be trying some of the new methods that have been developed so I am inviting you to join me as I struggle though the trials and tribulations of converting my former wood shop in the garage into what will hopefully be a fully scenicked and operational depiction of a logging railroad early in the 20th century.  I will be experimenting with poly foam and plaster cloth scenery base and trying my hand at DCC.  This is all new to me but should be a fun learning experience.


Our home has a three car tandem garage and I will be building the railroad in the rear stall.  I have removed everything from the wood shop except for some cabinets that will remain and be located under the bench work of the around-the-room railroad.


Here is a view from the rear of the garage showing the wall that I am installing to separate the train room from the rest of the garage.  The plastic boxes on the cabinets contain some of my model building kits and materials and will be stored under the bench work.


I have already started building the bench work and will post photos in a future post.  I might add that the temperatures in the San Joaquin Valley where I live often reach over 100 degrees in the summer so my model building will be somewhat limited during the summer months but I will be able to do some work early in the morning.  I hope to get the bench work finished and the road bed in before too long.  First I have to sheetrock the new wall and paint the room in some shade of blue that will represent the sky.  That's it for the first post.  I hope you will look in again.